Showing posts with label tabs. Show all posts

Monday, June 2, 2014

Storenvy: Adding top navigation tabs

This tutorial will help you customize your navigation links by adding tabs to the top of your page. You can see what they will look like at Bean Sprout Boutique.

STEP 1: Edit your HTML

1. To find your HTML codes, go to Store Admin>Design>HTML Pages >Layout>Using Custom HTML
2. Look for:  </div><!-- end #header --> Below that, is where you'll paste the new code.
3. Select and Copy/Paste the following code to your html.

<div id="topnav">
<ul id="tabnav">
<li class="tab1"><a href="http://www.yoururlhere.com/">Home</a></li>

<li class="tab1"><a href="http://www.yoururlhere.com/gallery">Gallery</a></li>
</ul>
</div>


4. Save changes.

*TIP: I only made tabs for the Home page and Gallery page. You can make as many as you wish. Just copy/paste the code and change the tab# and url for each.


STEP 2: Edit your CSS

1. To find your CSS codes, go to Store Admin>Design>CSS Mode
2. Copy and Paste the following code on your CSS page.

#topnav {
width: 200px;
margin: 0px 0px -9px 220px;
}

ul#tabnav {
text-align: left;
list-style-type: none;
}

ul#tabnav li {
display: inline;
background-color: #fff;
}

ul#tabnav li a {
padding: 7px;
color: #fff;
background-color: #70920a;
margin-right: 0px;
text-decoration: none;
}

ul#tabnav a:hover {
color: #3E4D02;
background-color: #fff;
}


3. Edit to fit your store theme and colors.
4. Save changes and preview your store.


My top navigation tabs look like this. You can see the entire page at Bean Sprout Boutique.


Tuesday, November 12, 2013

Storenvy: Linking your store to your blog with a page tab

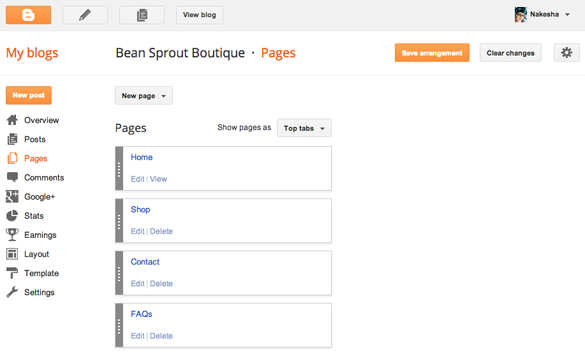
A great way to get your blog followers to your Storenvy shop, social media, or any other page you may have, is to add page tabs to your blog. It's an easy way for followers to access your store. This tutorial will show you how to add page tabs to your blog. I've added page tabs for my Bean Sprout Boutique shop, my contact page, and FAQ.


STEP 1: Select Pages from your Blogger Dashboard

1. Sign in to your blogger account and select your blog.
2. In the left column, click on Pages


STEP 2: Select New Page


1. Selecting Blank Page will open a page that looks just like creating a post. Compose your page, add HTML, photos, etc.


2. Selecting Web Address will open a dialog box. Page title is what will appear on the tab. Web address is the page you wish to link to.


STEP 3: Position tabs

1. Select the drop-down menu where it says Show pages as.
2. Select Top tabs, Side links, or Don't show
3. If you have created more than one tab, you can shuffle them in the order you wish them to appear. Click the gray bar and drag up and down.


STEP 4: Save your page

1. When you have finished creating your tabs and arranging them, make sure to click Save arrangement.


Your blog page should now be displaying the new tabs you've created. Click on each one to make sure they link to the assigned page without error. If you have any questions, please let me know: nakesha@beansproutboutique.com.