Showing posts with label how to. Show all posts

Tuesday, November 12, 2013

Storenvy: Linking your store to your blog with a page tab

A great way to get your blog followers to your Storenvy shop, social media, or any other page you may have, is to add page tabs to your blog. It's an easy way for followers to access your store. This tutorial will show you how to add page tabs to your blog. I've added page tabs for my Bean Sprout Boutique shop, my contact page, and FAQ.


STEP 1: Select Pages from your Blogger Dashboard

1. Sign in to your blogger account and select your blog.
2. In the left column, click on Pages
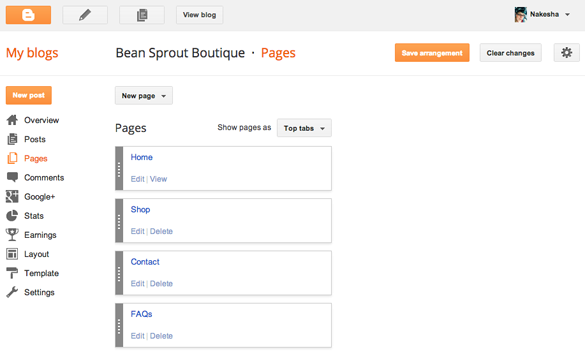


STEP 2: Select New Page


1. Selecting Blank Page will open a page that looks just like creating a post. Compose your page, add HTML, photos, etc.


2. Selecting Web Address will open a dialog box. Page title is what will appear on the tab. Web address is the page you wish to link to.


STEP 3: Position tabs

1. Select the drop-down menu where it says Show pages as.
2. Select Top tabs, Side links, or Don't show
3. If you have created more than one tab, you can shuffle them in the order you wish them to appear. Click the gray bar and drag up and down.


STEP 4: Save your page

1. When you have finished creating your tabs and arranging them, make sure to click Save arrangement.


Your blog page should now be displaying the new tabs you've created. Click on each one to make sure they link to the assigned page without error. If you have any questions, please let me know: nakesha@beansproutboutique.com.

Tuesday, August 6, 2013

Crochet: The Magic Ring Tutorial

The Magic Ring has changed the way I crochet. I hated that little unsightly hole left in the center when crocheting in the round. I didn't want a hole in the top of my hats. No matter how tightly I started off my chain, I could never fully close that darn circle.

Sure, there are times when having an open hole may be desirable, for instance, when making granny squares, flowers, and other motifs. But I really wanted a way to control the opening. Then I found the adjustable ring. Possibly, my favorite crochet technique ever. Warning: Once you try it, you may never go back to the other methods.

Magic Ring Tutorial

I'll be demonstrating using double crochet and will assume you know how to chain, slip stitch, and double crochet.

Step 1: Begin by making a loop, putting the tail of your yarn behind your working yarn. Leave at least a three-inch tail. As you become familiar with this method, you'll be able to leave a shorter tail if desired.


Step 2: Hold your strands where they overlap and insert your hook from front to back through the ring. Pull up one loop on your hook.


Step 3: Ch 3 (*counts as dc; see Note)


Step 4: Find a comfortable way to hold your ring as you begin to work dcs. Dc into the ring. Make certain to crochet over the tail as you go. Continue working as many dcs as needed for your pattern.


Step 5: Pull the tail to draw the ring closed. If your tail has looped around a few times, untwist it before pulling tight.


Step 6: Slst into your first dc when finished to begin next round. How tightly you draw your ring closed is up to you and the desired effect you hope to achieve.


*Note: Often, I do not count the ch 3 as a stitch when double crocheting. It mostly depends on the type and thickness of yarn I'm using. Thick and chunky yarns, I count ch 3 as a stitch. Thin yarns, I do not count ch 3 as a stitch. Use your own judgement as to what looks the best for your project.

I hope you enjoy this technique as much as I do! Please feel free to contact me at nakesha@beansproutboutique.com with any questions or clarifications. Happy hooking. :)