Monday, June 2, 2014

Storenvy: Adding top navigation tabs

This tutorial will help you customize your navigation links by adding tabs to the top of your page. You can see what they will look like at Bean Sprout Boutique.

STEP 1: Edit your HTML

1. To find your HTML codes, go to Store Admin>Design>HTML Pages >Layout>Using Custom HTML
2. Look for:  </div><!-- end #header --> Below that, is where you'll paste the new code.
3. Select and Copy/Paste the following code to your html.

<div id="topnav">
<ul id="tabnav">
<li class="tab1"><a href="http://www.yoururlhere.com/">Home</a></li>

<li class="tab1"><a href="http://www.yoururlhere.com/gallery">Gallery</a></li>
</ul>
</div>


4. Save changes.

*TIP: I only made tabs for the Home page and Gallery page. You can make as many as you wish. Just copy/paste the code and change the tab# and url for each.


STEP 2: Edit your CSS

1. To find your CSS codes, go to Store Admin>Design>CSS Mode
2. Copy and Paste the following code on your CSS page.

#topnav {
width: 200px;
margin: 0px 0px -9px 220px;
}

ul#tabnav {
text-align: left;
list-style-type: none;
}

ul#tabnav li {
display: inline;
background-color: #fff;
}

ul#tabnav li a {
padding: 7px;
color: #fff;
background-color: #70920a;
margin-right: 0px;
text-decoration: none;
}

ul#tabnav a:hover {
color: #3E4D02;
background-color: #fff;
}


3. Edit to fit your store theme and colors.
4. Save changes and preview your store.


My top navigation tabs look like this. You can see the entire page at Bean Sprout Boutique.


Wednesday, March 12, 2014

10 Craft Show Tips for Vendors

Preparing for a Craft Show or Art Fair can seem like a daunting task, especially if it's your first time. I've done six shows now, and each time, I find something to perfect. All of my shows have been indoor. I've yet to attempt an outdoor fair and honestly, I doubt I will. I sell crochet photography props and children's hats, but these tips in general should help any vendor get started.

1. Branding
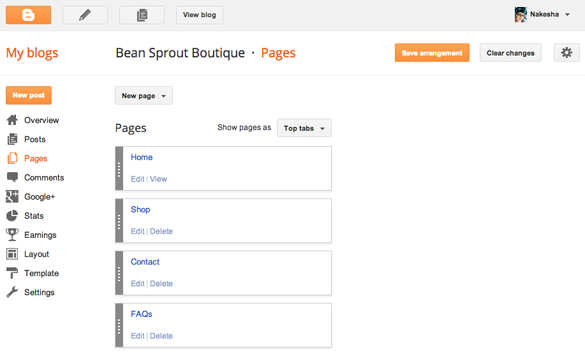
    Make sure people know who you are! Your booth colors should represent your brand. Have brand signage that is easy to see, even in a crowded booth. Business cards should be easily accessible. You want people to remember you, even if they don't buy something today.
    I keep my business cards and some chocolate candy in a pretty leaf bowl that matches my branding. I have it near the edge of the table so people passing by can easily take one. My sign is currently in a photo frame that I position near my business cards.

2. Display
   Make your booth easy to shop. Think about different levels and bringing products to eye level. Items laying flat on a table are difficult to see and access. Rearrange if something isn't working.
   I stack old crates to build height. I made my own hat stands to display seasonal items. I use baskets to organize my hats into different size groups.


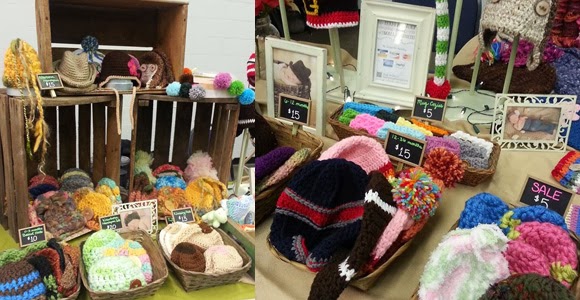
Using crates has helped me add height and interest to my display. I was lucky enough to score them for free from my grandparents! The price signs were easy to make and are convenient to move and retag.
3. Pricing
   Don't forget to price your items and make sure prices are visible. You can individually price items, or organize products into groups with clear signage.
   I used to individually tag items, but ran across a few problems. It was often difficult for customers to find the tag and potential customers passing by couldn't see the prices. If I wanted to change prices for different shows, I had to retag everything! I opted to make signs from small chalkboards glued to clothes pins. It's easy to clip to the baskets and change prices.
   For more information on how to price your items, there's a great guest article on Moogly

4. Payment
   Offer more than one way to pay. If you have a smart phone or tablet, check out Square and Paypal. Both make it very easy to accept credit card payments. Make sure to have change for cash purchases.

5. Workspace
   The more organized you are behind your display, the easier it is to help customers. Designate a space to keep your cash drawer, shopping bags, and extra merchandise, etc.

6. Hide Extras
   Keeping extra merchandise and materials under or behind your display will help keep your space looking tidy. Refill your items and tidy up your display as products sell.

7. Yourself
   Present your best self. Dress professionally and behave cordially. If you sell a product you can wear, wear it! Greet everyone and thank them for stopping by. If you have a product that can be made at the show, create something in down time. Customers love to see you work and talk about your project.

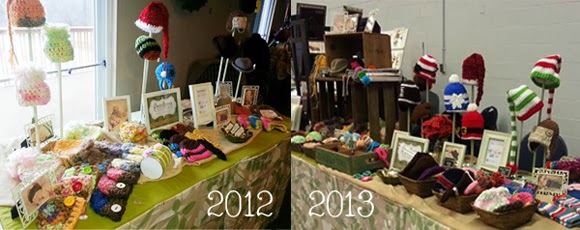
(Left) One of my very first shows. I didn't have much merchandise. My display consisted of professional photos of babies wearing my hats and handmade hat stands. (Right) Almost a year from the first photo, I've added some crates, baskets, and a variety of products.
8. Know Your Stuff
   Be prepared to answer questions about your product. Talk about your products and how they can be used. Don't be afraid to ask customers who they are shopping for and point out which products may be suitable. Being confident and well informed about the items you sell will inspire confidence in the buyer.

9. Venue
   Make sure you know when you can set up your display and if there is a specific entrance to use. Some venues may provide a table and chair, but I always bring my own! Find out how much space you have so you can prepare what to bring ahead of time. Always be prepared for any situation.

10. Snacks
   Lots of water and non-messy snacks will get you through a busy day!

 If you have any tips or advice you'd like to share, or would like more info on the DIY side of things, please feel free to leave a comment!

Tuesday, November 12, 2013

Storenvy: Linking your store to your blog with a page tab

A great way to get your blog followers to your Storenvy shop, social media, or any other page you may have, is to add page tabs to your blog. It's an easy way for followers to access your store. This tutorial will show you how to add page tabs to your blog. I've added page tabs for my Bean Sprout Boutique shop, my contact page, and FAQ.


STEP 1: Select Pages from your Blogger Dashboard

1. Sign in to your blogger account and select your blog.
2. In the left column, click on Pages


STEP 2: Select New Page


1. Selecting Blank Page will open a page that looks just like creating a post. Compose your page, add HTML, photos, etc.


2. Selecting Web Address will open a dialog box. Page title is what will appear on the tab. Web address is the page you wish to link to.


STEP 3: Position tabs

1. Select the drop-down menu where it says Show pages as.
2. Select Top tabs, Side links, or Don't show
3. If you have created more than one tab, you can shuffle them in the order you wish them to appear. Click the gray bar and drag up and down.


STEP 4: Save your page

1. When you have finished creating your tabs and arranging them, make sure to click Save arrangement.


Your blog page should now be displaying the new tabs you've created. Click on each one to make sure they link to the assigned page without error. If you have any questions, please let me know: nakesha@beansproutboutique.com.

Monday, November 4, 2013

Contest: Give Thanks and Win **UPDATED**


**THE GIVEAWAY HAS ENDED** November is the month of giving thanks. As a THANK YOU to all my fans, Bean Sprout Boutique is giving away a custom crochet hat on Facebook! Share your favorite Thanksgiving memory or something you're thankful for to be entered to win. Then vote for your favorite entry. The person with the most votes will win a custom made crochet hat from Bean Sprout Boutique.


**AND THE WINNER IS........**


Here's Angie in her new custom hat from Bean Sprout Boutique! It was so fun to create this custom design for her. Thank you to everyone who participated in the contest. :)

Thursday, August 15, 2013

Crochet: How much yarn do I need?

Whenever I'm getting ready to start a new project, I always get stuck determining how many yards of yarn I need. Making hats and other small projects is usually no problem. I grab one or two skeins and head to the checkout. But larger projects, like blankets, I'm stumped. So I play the guessing game and hope I get lucky. So far, I have.

If you're working from a pattern, it's a little easier. Usually, the pattern will tell you precisely how many balls of yarn you need.

Number of skeins called for in the pattern × yards per skein = total yards needed

But if you are designing your own pattern, or using different yarn than suggested, it can get tricky. After some internet searching, I came across a helpful chart from Lion Brand. Using the chart, I was able to make an educated guess at the amount of yarn I'll need. It's definitely better than guessing!

I also came across a couple of mobile apps that may make future yarn shopping easier.


1. Crochet Handy - iOS - $.99
This app helps you quickly determine how much yarn you need for your next crochet project.
This seems like a great tool, though possibly missing out on some features, such as, hook size and a limited project list. Alas, I'm an Android user and this app is only available on iOS, so I haven't tried it. If anyone tries it out, let me know how it works for you. And please, someone make something similar for Android users!


2. Yarn Shopper - Android - FREE
This app helps you see how many skeins of yarn you'll need and how much you'll pay for your project. It has a built-in list of top yarns in each weight category, but lets you add and edit your own yarn descriptions as well.

This app makes shopping around for yarn so much easier! Though it may not be great for helping me determine yardage, it does help me keep yarn and prices organized. Hopefully, the developers will keep adding new features. I'd love to see a barcode scanner and a place to add an image.

If any of you have tried and true ways of determining how much yarn you need for a project, please share! I'd love to continue taking the guess work out or yarn buying.

Tuesday, August 6, 2013

Crochet: The Magic Ring Tutorial

The Magic Ring has changed the way I crochet. I hated that little unsightly hole left in the center when crocheting in the round. I didn't want a hole in the top of my hats. No matter how tightly I started off my chain, I could never fully close that darn circle.

Sure, there are times when having an open hole may be desirable, for instance, when making granny squares, flowers, and other motifs. But I really wanted a way to control the opening. Then I found the adjustable ring. Possibly, my favorite crochet technique ever. Warning: Once you try it, you may never go back to the other methods.

Magic Ring Tutorial

I'll be demonstrating using double crochet and will assume you know how to chain, slip stitch, and double crochet.

Step 1: Begin by making a loop, putting the tail of your yarn behind your working yarn. Leave at least a three-inch tail. As you become familiar with this method, you'll be able to leave a shorter tail if desired.


Step 2: Hold your strands where they overlap and insert your hook from front to back through the ring. Pull up one loop on your hook.


Step 3: Ch 3 (*counts as dc; see Note)


Step 4: Find a comfortable way to hold your ring as you begin to work dcs. Dc into the ring. Make certain to crochet over the tail as you go. Continue working as many dcs as needed for your pattern.


Step 5: Pull the tail to draw the ring closed. If your tail has looped around a few times, untwist it before pulling tight.


Step 6: Slst into your first dc when finished to begin next round. How tightly you draw your ring closed is up to you and the desired effect you hope to achieve.


*Note: Often, I do not count the ch 3 as a stitch when double crocheting. It mostly depends on the type and thickness of yarn I'm using. Thick and chunky yarns, I count ch 3 as a stitch. Thin yarns, I do not count ch 3 as a stitch. Use your own judgement as to what looks the best for your project.

I hope you enjoy this technique as much as I do! Please feel free to contact me at nakesha@beansproutboutique.com with any questions or clarifications. Happy hooking. :)


Thursday, July 25, 2013

Crochet: Tips for Writing Good Patterns

I've finally decided to take the plunge and turn my scribbles and notes into actual crochet patterns that someone besides myself could understand. The first step was determining which hat pattern I wanted to write out. After all, some of the hats I've made are from other people's patterns. And others, well, maybe no one would want to make. So I narrowed it down and chose the Aviator Hat. It's cute and popular and fairly easy for a beginner.

Getting started was a little intimidating. Luckily, I take really good notes and already had this pattern pretty well worked out. After looking at some of the patterns I've purchased and found easy to use, I found some common trends. I decided to piece together the things I liked to make my own template. Below are the top ten things I found to be important to include in a crochet pattern.


1. Include the name of the pattern, your name, and your web address.
Once a customer downloads your pattern, you want to make sure they know where they purchased it and can find you again in the future.

2. Include a photo of the finished product.
I love to open a pattern and see a large image of the item. Not only is it a quick reference, but it inspires me to want to make the project.

3. Have a copyright notice for your protection. 
Decide whether customers will be permitted to sell items made from the pattern. Here is my copyright notice: © Copyright Notice: You have permission to sell the finished product for this pattern. If you sell the finished hats online, I would love if you would include a link to my pattern at www.beansproutboutique.com. The pattern and the images are copyright protected. Rewriting, reselling, distributing, or copying the pattern or using the images to sell your finished items is prohibited. Thank you for your understanding and cooperation. © Copyright 2013 Bean Sprout Boutique

4. List the sizes included in the pattern. 
If you are creating clothing items or items that may have different sizes, decide if you will you offer one size or patterns for several.

5. Have a materials list. 
Be sure to include hook sizes, the weight and brand of yarn, and any other notions you may need to complete the final look of the project.

6. Terms or Abbreviations
Having a terms or abbreviations list can be very helpful, especially for a beginning crocheter. Using yarn industry standard terms is important. The Craft Yarn Council has a list of standard terms if you need a reference.

7. Include your gauge. 
For some items, size may not matter. However, if your pattern is for a clothing item, gauge is important! Checking the gauge will let the pattern reader know if he or she will need to use a larger or smaller hook to obtain the correct finished size.

8. Pattern notes 
If your pattern has special instructions regarding the stitches, pattern notes may help clarify.

9. Pattern instructions 
How you write your pattern is very important. Begin with Round or Row, depending on the project. Make sure to use the abbreviations, terms, and symbols to save space and make the pattern easier to read. And include a stitch count at the end of each Round or Row. You may also want to include photos during various steps of the project.

10. Include a stitch guide. 
Stitch guides are written instructions for how to complete each stitch. Including this in the pattern will help alleviate the need for the pattern reader to search for tutorials on how to complete the stitch.