Tuesday, November 12, 2013

Storenvy: Linking your store to your blog with a page tab

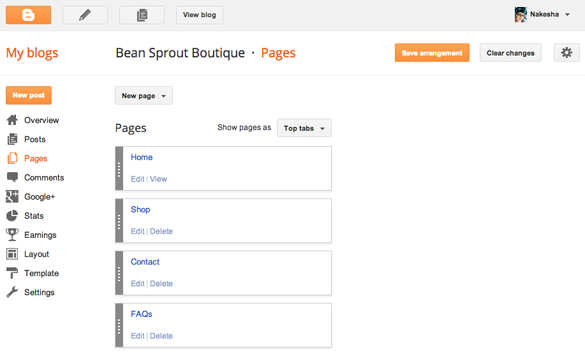
A great way to get your blog followers to your Storenvy shop, social media, or any other page you may have, is to add page tabs to your blog. It's an easy way for followers to access your store. This tutorial will show you how to add page tabs to your blog. I've added page tabs for my Bean Sprout Boutique shop, my contact page, and FAQ.


STEP 1: Select Pages from your Blogger Dashboard

1. Sign in to your blogger account and select your blog.
2. In the left column, click on Pages


STEP 2: Select New Page


1. Selecting Blank Page will open a page that looks just like creating a post. Compose your page, add HTML, photos, etc.


2. Selecting Web Address will open a dialog box. Page title is what will appear on the tab. Web address is the page you wish to link to.


STEP 3: Position tabs

1. Select the drop-down menu where it says Show pages as.
2. Select Top tabs, Side links, or Don't show
3. If you have created more than one tab, you can shuffle them in the order you wish them to appear. Click the gray bar and drag up and down.


STEP 4: Save your page

1. When you have finished creating your tabs and arranging them, make sure to click Save arrangement.


Your blog page should now be displaying the new tabs you've created. Click on each one to make sure they link to the assigned page without error. If you have any questions, please let me know: nakesha@beansproutboutique.com.

Monday, November 4, 2013

Contest: Give Thanks and Win **UPDATED**


**THE GIVEAWAY HAS ENDED** November is the month of giving thanks. As a THANK YOU to all my fans, Bean Sprout Boutique is giving away a custom crochet hat on Facebook! Share your favorite Thanksgiving memory or something you're thankful for to be entered to win. Then vote for your favorite entry. The person with the most votes will win a custom made crochet hat from Bean Sprout Boutique.


**AND THE WINNER IS........**


Here's Angie in her new custom hat from Bean Sprout Boutique! It was so fun to create this custom design for her. Thank you to everyone who participated in the contest. :)

Thursday, August 15, 2013

Crochet: How much yarn do I need?

Whenever I'm getting ready to start a new project, I always get stuck determining how many yards of yarn I need. Making hats and other small projects is usually no problem. I grab one or two skeins and head to the checkout. But larger projects, like blankets, I'm stumped. So I play the guessing game and hope I get lucky. So far, I have.

If you're working from a pattern, it's a little easier. Usually, the pattern will tell you precisely how many balls of yarn you need.

Number of skeins called for in the pattern × yards per skein = total yards needed

But if you are designing your own pattern, or using different yarn than suggested, it can get tricky. After some internet searching, I came across a helpful chart from Lion Brand. Using the chart, I was able to make an educated guess at the amount of yarn I'll need. It's definitely better than guessing!

I also came across a couple of mobile apps that may make future yarn shopping easier.


1. Crochet Handy - iOS - $.99
This app helps you quickly determine how much yarn you need for your next crochet project.
This seems like a great tool, though possibly missing out on some features, such as, hook size and a limited project list. Alas, I'm an Android user and this app is only available on iOS, so I haven't tried it. If anyone tries it out, let me know how it works for you. And please, someone make something similar for Android users!


2. Yarn Shopper - Android - FREE
This app helps you see how many skeins of yarn you'll need and how much you'll pay for your project. It has a built-in list of top yarns in each weight category, but lets you add and edit your own yarn descriptions as well.

This app makes shopping around for yarn so much easier! Though it may not be great for helping me determine yardage, it does help me keep yarn and prices organized. Hopefully, the developers will keep adding new features. I'd love to see a barcode scanner and a place to add an image.

If any of you have tried and true ways of determining how much yarn you need for a project, please share! I'd love to continue taking the guess work out or yarn buying.

Tuesday, August 6, 2013

Crochet: The Magic Ring Tutorial

The Magic Ring has changed the way I crochet. I hated that little unsightly hole left in the center when crocheting in the round. I didn't want a hole in the top of my hats. No matter how tightly I started off my chain, I could never fully close that darn circle.

Sure, there are times when having an open hole may be desirable, for instance, when making granny squares, flowers, and other motifs. But I really wanted a way to control the opening. Then I found the adjustable ring. Possibly, my favorite crochet technique ever. Warning: Once you try it, you may never go back to the other methods.

Magic Ring Tutorial

I'll be demonstrating using double crochet and will assume you know how to chain, slip stitch, and double crochet.

Step 1: Begin by making a loop, putting the tail of your yarn behind your working yarn. Leave at least a three-inch tail. As you become familiar with this method, you'll be able to leave a shorter tail if desired.


Step 2: Hold your strands where they overlap and insert your hook from front to back through the ring. Pull up one loop on your hook.


Step 3: Ch 3 (*counts as dc; see Note)


Step 4: Find a comfortable way to hold your ring as you begin to work dcs. Dc into the ring. Make certain to crochet over the tail as you go. Continue working as many dcs as needed for your pattern.


Step 5: Pull the tail to draw the ring closed. If your tail has looped around a few times, untwist it before pulling tight.


Step 6: Slst into your first dc when finished to begin next round. How tightly you draw your ring closed is up to you and the desired effect you hope to achieve.


*Note: Often, I do not count the ch 3 as a stitch when double crocheting. It mostly depends on the type and thickness of yarn I'm using. Thick and chunky yarns, I count ch 3 as a stitch. Thin yarns, I do not count ch 3 as a stitch. Use your own judgement as to what looks the best for your project.

I hope you enjoy this technique as much as I do! Please feel free to contact me at nakesha@beansproutboutique.com with any questions or clarifications. Happy hooking. :)


Thursday, July 25, 2013

Crochet: Tips for Writing Good Patterns

I've finally decided to take the plunge and turn my scribbles and notes into actual crochet patterns that someone besides myself could understand. The first step was determining which hat pattern I wanted to write out. After all, some of the hats I've made are from other people's patterns. And others, well, maybe no one would want to make. So I narrowed it down and chose the Aviator Hat. It's cute and popular and fairly easy for a beginner.

Getting started was a little intimidating. Luckily, I take really good notes and already had this pattern pretty well worked out. After looking at some of the patterns I've purchased and found easy to use, I found some common trends. I decided to piece together the things I liked to make my own template. Below are the top ten things I found to be important to include in a crochet pattern.


1. Include the name of the pattern, your name, and your web address.
Once a customer downloads your pattern, you want to make sure they know where they purchased it and can find you again in the future.

2. Include a photo of the finished product.
I love to open a pattern and see a large image of the item. Not only is it a quick reference, but it inspires me to want to make the project.

3. Have a copyright notice for your protection. 
Decide whether customers will be permitted to sell items made from the pattern. Here is my copyright notice: © Copyright Notice: You have permission to sell the finished product for this pattern. If you sell the finished hats online, I would love if you would include a link to my pattern at www.beansproutboutique.com. The pattern and the images are copyright protected. Rewriting, reselling, distributing, or copying the pattern or using the images to sell your finished items is prohibited. Thank you for your understanding and cooperation. © Copyright 2013 Bean Sprout Boutique

4. List the sizes included in the pattern. 
If you are creating clothing items or items that may have different sizes, decide if you will you offer one size or patterns for several.

5. Have a materials list. 
Be sure to include hook sizes, the weight and brand of yarn, and any other notions you may need to complete the final look of the project.

6. Terms or Abbreviations
Having a terms or abbreviations list can be very helpful, especially for a beginning crocheter. Using yarn industry standard terms is important. The Craft Yarn Council has a list of standard terms if you need a reference.

7. Include your gauge. 
For some items, size may not matter. However, if your pattern is for a clothing item, gauge is important! Checking the gauge will let the pattern reader know if he or she will need to use a larger or smaller hook to obtain the correct finished size.

8. Pattern notes 
If your pattern has special instructions regarding the stitches, pattern notes may help clarify.

9. Pattern instructions 
How you write your pattern is very important. Begin with Round or Row, depending on the project. Make sure to use the abbreviations, terms, and symbols to save space and make the pattern easier to read. And include a stitch count at the end of each Round or Row. You may also want to include photos during various steps of the project.

10. Include a stitch guide. 
Stitch guides are written instructions for how to complete each stitch. Including this in the pattern will help alleviate the need for the pattern reader to search for tutorials on how to complete the stitch.
Tuesday, July 23, 2013

Storenvy: Opening social links in new window

**UPDATE: This tutorial was made pre-Cooper theme update.**


By default, the Social links in the footer of your page with redirect the user to those sites in the same window, causing them to leave your site. If you'd like those links to open in a new window, this tutorial will show your how. It looks like a lot of code, but we'll only be adding target="_blank" to existing code. My navigation looks like the image below. You can see the entire page at Bean Sprout Boutique.


STEP 1: Edit your HTML

1. To find your HTML codes, go to Store Admin>Design>HTML Pages>Layout>Using Custom HTML
2. Look for:  <div id="footer"> Scroll down and you'll see the code for the Social navigation.
It will look like this:

<li>
{% if store.places != blank  %}
  <span class="footer-large">SOCIAL</span><br/>
  <ul>
  {% if store.twitter_url %}<li><a href="{{store.twitter_url}}" class="footer-social-link twitter"></a></li>{% endif %}
  {% if store.facebook_url %}<li><a href="{{store.facebook_url}}" class="footer-social-link facebook"></a></li>{% endif %}
  {% if store.tumblr_url %}<li><a href="{{store.tumblr_url}}" class="footer-social-link tumblr"></a></li>{% endif %}
  </ul>
{% endif %}
</li>


3. Copy the following code and paste it inside the <a> tag.

    target="_blank"

4. Your code should look like this:

<li>
{% if store.places != blank  %}
    <span class="footer-large">SOCIAL</span><br/>
   <ul>
   {% if store.twitter_url %}<li><a href="{{store.twitter_url}}" class="footer-social-link twitter"
target="_blank"></a></li>{% endif %}
   {% if store.facebook_url %}<li><a href="{{store.facebook_url}}" class="footer-social-link facebook" 
target="_blank"></a></li>{% endif %}
   {% if store.tumblr_url %}<li><a href="{{store.tumblr_url}}" class="footer-social-link tumblr" 
target="_blank"></a></li>{% endif %}
   </ul>
 {% endif %}
 </li>


5. Save changes and preview your store.

--------

STEP 2: Add your other Social media links

Storenvy uses an image for the Twitter, Facebook, and Tumblr links. Someday, I may create and host my own icons for Pinterest, Instagram and Blogger to use in the Social links, but for now, I just have text.

1. To find your HTML codes, go to Store Admin>Design>HTML Pages>Layout>Using Custom HTML
2. Look for:  <div id="footer"> Scroll down and you'll see the code for the Social navigation. It will look like this:

<li>
{% if store.places != blank  %}
   <span class="footer-large">SOCIAL</span><br/>
   <ul>
   {% if store.twitter_url %}<li><a href="{{store.twitter_url}}" class="footer-social-link twitter" target="_blank"></a></li>{% endif %}
   {% if store.facebook_url %}<li><a href="{{store.facebook_url}}" class="footer-social-link facebook" target="_blank"></a></li>{% endif %}
   {% if store.tumblr_url %}<li><a href="{{store.tumblr_url}}" class="footer-social-link tumblr" target="_blank"></a></li>{% endif %}
   </ul>
 {% endif %}
</li>


3. Add <br /> after the last Tumblr link. Copy the following code and paste it after your Tumblr link.

<li><a href="http://pinterest.com/yourname" target="_blank">Pinterest</a> </li><br />
<li><a href="instagram.com/yourname" target="_blank">Instagram</a> </li><br />
<li><a href="http://yourname.blogspot.com/" target="_blank">Blogger</a> </li>


4. Your finished code should look like this:

 <li>
{% if store.places != blank  %}
   <span class="footer-large">SOCIAL</span><br/>
   <ul>
   {% if store.twitter_url %}<li><a href="{{store.twitter_url}}" class="footer-social-link twitter" target="_blank"></a></li>{% endif %}
   {% if store.facebook_url %}<li><a href="{{store.facebook_url}}" class="footer-social-link facebook" target="_blank"></a></li>{% endif %}
   {% if store.tumblr_url %}<li><a href="{{store.tumblr_url}}" class="footer-social-link tumblr" target="_blank"></a></li>{% endif %}
<br />
   <li><a href="http://pinterest.com/yourname" target="_blank">Pinterest</a> </li><br />
   <li><a href="instagram.com/yourname" target="_blank">Instagram</a> </li><br />
   <li><a href="http://yourname.blogspot.com/" target="_blank">Blogger</a> </li>
   </ul>

{% endif %}
</li>


5. Save changes and preview your store.

*TIP: Your links may look different depending on the social media sites you use.

Here is what my finished footer looks like. You can see the entire page at Bean Sprout Boutique.


Storenvy: Adding navigation headlines

This tutorial will help you customize your Navigation, in the new Cooper theme, by adding headlines to the categories in your sidebar. My navigation looks like the image below. You can see the entire page at Bean Sprout Boutique.


STEP 1: Edit your HTML

1. To find your HTML codes, go to Store Admin>Design>HTML Pages>Layout>Using Custom HTML
2. Look for:  <div id="sidebar"> Below that, you'll see the code for the navigation.
3. Copy the following code.

   <hr/>
   <h3>Categories</h3>
   <hr />


4. Look for:  <ul id="nav"> and paste the code above it.
5. Repeat above  <ul id="buttons"> and <ul id="places">
6. Save changes and preview your store.

*TIP: I moved my "places" above my "buttons."

--------

STEP 2: Edit your CSS

1. To find your CSS codes, go to Store Admin>Design>Theme>CSS Mode
2. Copy and Paste the following code to your CSS page.

   #sidebar h3 {
    margin: 5px 0px 5px 0px;
    color: #70920a;
   }


3. Edit the color to fit your store theme.
4. Save changes and preview your store.


*TIP: Consider mobile devices when selecting your headline color. The navigation background on mobile is a dark gray. Dark colors may not show up very well.

Monday, July 15, 2013

Storenvy: Moving navigation (collections) from top to the sidebar

**UPDATE: This tutorial was made pre-Cooper theme update.**


This tutorial will help you customize your Navigation links and move them from the top to your sidebar. You can see what they will look like at Bean Sprout Boutique.


STEP 1: Edit your HTML

1. To find your HTML codes, go to Store Admin>Design>Theme>Edit Pages >Layout>Using Custom HTML
2. Look for:  <div id="container"> Below that, you'll see the code for the navigation.
3. Select and Cut the following code from your html.

<ul id="nav">
          {% for nav_item in collections.all %}
          <li id="collection_{{nav_item.id}}_link" {% if nav_item == collection %} class="current" {% endif %}>
            <a href="{{nav_item.url}}">
              {{ nav_item.name }}
              <span class="collection_count">({{ nav_item.product_count }})</span>
            </a>
          </li>
          {% endfor %}
        </ul>

4. Look for:  <div id="sidebar"> and paste the navigation code below it.
5. Save changes and preview your store.


*TIP: If you have an avatar on your page and want the navigation after it, look for <div id="avatar"> and paste the navigation code after the </div>.


STEP 2: Edit your CSS

1. To find your CSS codes, go to Store Admin>Design>Theme>Edit Styles>CSS Mode
2. Find the following code on your CSS page. If it isn't there, then Copy and Paste the following code on your CSS page.

/*: Navigation Links :*/

#nav {
background-color: #FFFFFF; 
overflow: hidden;
margin: 0;
padding: 0 5px 10px;
display: block;
width: 200px;
}

#nav li {
float: left;
}

#nav li a {
color: #70920a;     /*: Change to fit your color scheme :*/                    
display: block;
margin: 0 4px 4px 0;
padding: 5px 10px;
font-weight: bold;   /*: Change to normal is you don't want them bold. :*/
font-size: 18px;   /*: Change if you want the font larger or smaller :*/
}

#nav li.current a {
  color: #703C0A;          /*: This is the color that will appear when you are on the current page. Change to fit your color scheme. :*/          
}

#nav li a:hover {
background-color: #FFFFFF;        
color: #926312;         /*: Change to a different color for the rollover :*/
text-decoration: none;
}

#nav li span.collection_count {
font-size: 11px;
vertical-align: 1px;
font-weight: normal;
}

3. Edit to fit your store theme and colors.
4. Save changes and preview your store.


My navigation looks like this. You can see the entire page at Bean Sprout Boutique.


Thursday, July 11, 2013

Storenvy: Adding and Customizing Buttons

**UPDATE: This tutorial was made pre-Cooper theme update.**


There is a wonderful tutorial on Jotting Down Life about customizing your Storenvy storefront. She covers how to change fonts, move the navigation to the sidebar, edit your buttons, and hide tags.

This tutorial will elaborate on adding and customizing your Social Media links in your sidebar navigation. You can see what they will look like at Bean Sprout Boutique.


STEP 1: Edit your HTML

1. To find your HTML codes, go to Store Admin>Design>Theme>Edit Pages >Layout>Using Custom HTML
2. Look for:   <div id=”buttons”>
3. Add links to your pages in the following format.
 
<div id="buttons">
  <a href="http://www.facebook.com/yourname" target="_blank">Facebook</a>
  <a href="http://www.instagram.com/yourname" target="_blank">Instagram</a>
  <a href="http://yourname.tumblr.com/" target="_blank">Tumblr</a>
  <a href="http://www.twitter.com/yourname" target="_blank">Twitter</a>
  <a href="http://www.pinterest.com/yourname" target="_blank">Pinterest</a>
  <a href="{{ pages.contact.url }}" class="contact_us">Contact</a>
  <a href="{{ pages.faq.url }}" class="faqs">FAQs</a>
</div>  <!-- end #buttons -->


4. Save changes and preview your store.

*TIP: Adding target="_blank"> will allow the links to open in a new window.


STEP 2: Edit your CSS

1. To find your CSS codes, go to Store Admin>Design>Theme>Edit Styles>CSS Mode
2. Copy and Paste the following code on your CSS page.

/*: Sidebar Navigation Buttons :*/

#buttons {
position: relative;
-moz-border-radius: 5px;   /* This creates the rounded corners. */
-webkit-border-radius: 5px;  /* This creates the rounded corners. */
text-align: center;
font-weight: bold;
font-size: 14px;
}

#buttons a {

color: #fff;    /* This is the text color. */
background: #70920a;   /* Change to your choosen theme color. */
display: block;
border: 1px solid #d5d5d5;
margin-bottom: 5px;
padding: 10px;
}

#buttons a:hover {

color: #fff;   /* This is the text color. */
background-color: #3E4D02;    /* Change to different color for rollover effect. */
background-image: none;
text-decoration: none;
margin-bottom: 5px;
padding: 10px;
}


3. Edit to fit your store theme and colors.
4. Save changes and preview your store.


My buttons look like this. You can see the entire page at Bean Sprout Boutique.


Welcome

Introductions...

Hello! My name is Nakesha, and I'm a crochetaholic. I'm also a graphic designer, wife, mommy of toddler twins, and a music lover. In my younger years, I played bass guitar in a band called murmur with my husband and some friends. I have an interest in health food and worked at a health food store throughout my college years. Most recently, I had a career as a graphic designer at a business newspaper.

I resigned from the daily grind of the corporate world to focus on raising my family, but I refused to entirely give up on something I'm passionate about, creating, no matter what form it takes. So I decided to turn a life-long hobby into a small business venture. I opened Bean Sprout Boutique, an online shop, selling handmade crocheted baby hats and photography props. I also continue to freelance in graphic design, when a need arises, and put my design skills to use in marketing my own business.

With this blog, I hope to share pieces of my daily life, design tips and tricks, crochet projects, and anything else I can think of. I look forward to meeting you all and sharing in this journey with you!