Preparing for a Craft Show or Art Fair can seem like a daunting task, especially if it's your first time. I've done six shows now, and each time, I find something to perfect. All of my shows have been indoor. I've yet to attempt an outdoor fair and honestly, I doubt I will. I sell crochet photography props and children's hats, but these tips in general should help any vendor get started.
1. Branding
Make sure people know who you are! Your booth colors should represent your brand. Have brand signage that is easy to see, even in a crowded booth. Business cards should be easily accessible. You want people to remember you, even if they don't buy something today.
I keep my business cards and some chocolate candy in a pretty leaf bowl that matches my branding. I have it near the edge of the table so people passing by can easily take one. My sign is currently in a photo frame that I position near my business cards.
2. Display
Make your booth easy to shop. Think about different levels and bringing products to eye level. Items laying flat on a table are difficult to see and access. Rearrange if something isn't working.
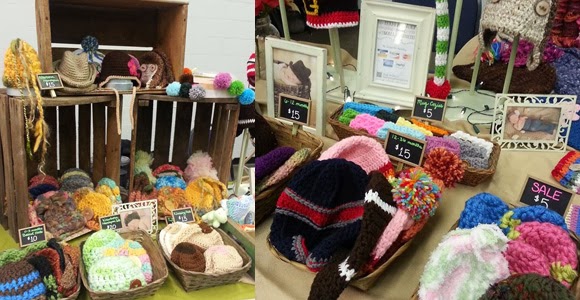
I stack old crates to build height. I made my own hat stands to display seasonal items. I use baskets to organize my hats into different size groups.
 |
| Using crates has helped me add height and interest to my display. I was lucky enough to score them for free from my grandparents! The price signs were easy to make and are convenient to move and retag. |
3. Pricing
Don't forget to price your items and make sure prices are visible. You can individually price items, or organize products into groups with clear signage.
I used to individually tag items, but ran across a few problems. It was often difficult for customers to find the tag and potential customers passing by couldn't see the prices. If I wanted to change prices for different shows, I had to retag everything! I opted to make signs from small chalkboards glued to clothes pins. It's easy to clip to the baskets and change prices.
For more information on how to price your items, there's a great guest article on
Moogly.
4. Payment
Offer more than one way to pay. If you have a smart phone or tablet, check out
Square and
Paypal. Both make it very easy to accept credit card payments. Make sure to have change for cash purchases.
5. Workspace
The more organized you are behind your display, the easier it is to help customers. Designate a space to keep your cash drawer, shopping bags, and extra merchandise, etc.
6. Hide Extras
Keeping extra merchandise and materials under or behind your display will help keep your space looking tidy. Refill your items and tidy up your display as products sell.
7. Yourself
Present your best self. Dress professionally and behave cordially. If you sell a product you can wear, wear it! Greet everyone and thank them for stopping by. If you have a product that can be made at the show, create something in down time. Customers love to see you work and talk about your project.
 |
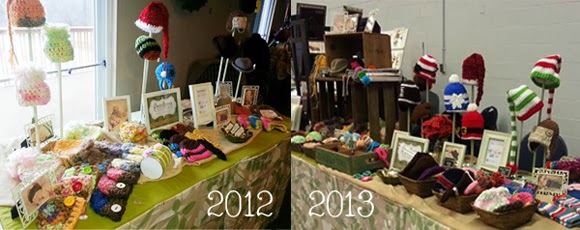
| (Left) One of my very first shows. I didn't have much merchandise. My display consisted of professional photos of babies wearing my hats and handmade hat stands. (Right) Almost a year from the first photo, I've added some crates, baskets, and a variety of products. |
8. Know Your Stuff
Be prepared to answer questions about your product. Talk about your products and how they can be used. Don't be afraid to ask customers who they are shopping for and point out which products may be suitable. Being confident and well informed about the items you sell will inspire confidence in the buyer.
9. Venue
Make sure you know when you can set up your display and if there is a specific entrance to use. Some venues may provide a table and chair, but I always bring my own! Find out how much space you have so you can prepare what to bring ahead of time. Always be prepared for any situation.
10. Snacks
Lots of water and non-messy snacks will get you through a busy day!
If you have any tips or advice you'd like to share, or would like more info on the DIY side of things, please feel free to leave a comment!


